But can you inject DaRT 8 into Windows 8 with OSD in SCCM 2007? Follow to find out... (the answer is yes)...
With tomorrow being T-day (Happy Thanksgiving to all!) here in the States, this article will be a little more step based and less discussion based as my goal is to get the information out on to digital paper quickly and get back to thinking about tomorrow's soon-to-be Turkey dinner with fixings and various sides.
The first step is to ensure you have a Partition to put DaRT onto. Yes, you can put the tools right on the main C:\, but if you are using BitLocker or other encryption options (like McAfee EEPC), then you need the tools to be on a non-encrypted partition.
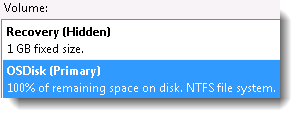
Note that the partition type was Hidden. I originally tried this with the drive being another Primary, and found that when I hid it in later steps it confused the Task Sequence Manager since many of the variables are set early and not changed and upon hiding it, the partition letters changed. I'm sure there's a simple way around this, but my answer was to use Hidden. When you make a drive Hidden, it is formatted as a RAW, not FAT or NTFS.

At this point, we need to create two Software Distribution Packages. One will be for the DiskPart scripts and the second will contain the DaRT 8 WIM. I originally used one package for both, but since it is called three times, I didn't like the ~350 MB WIM being downloaded each time. With two packages, it's only downloaded once. Here are the two files you need to create and put into the "DaRT Scripts" package:
RE_Show.txt
select disk 0
detail disk
select partition 1
delete partition override
create partition primary
select partition 1
format fs=ntfs label=Recovery quick
assign Letter =S
detail disk
Exit
RE_Hide.txt
Select Disk 0
Select Partition 1
Remove
set id=27 override
Detail Disk
list volume
Exit
Let's talk about what these do before moving on. 'RE_Show' connects with the 1 GB Hidden partition (remember, it's RAW so we really can't use it yet), deletes it, recreates it in the same space, formatted as NTFS, and then assigns it the drive letter S:.
'RE_Hide' is used once the other steps are done. It connects with our 1 GB partition (now no longer hidden, but formatted as NTFS), removes the drive letter assignment, and changes the type to 27 which is a Hidden Recovery partition (but still NTFS!). The other steps are more for debugging when looking at logs to see what happened.

Assign Drive Letter to RecoveryDisk
Command line: cmd /c DiskPart.exe /s RE_Show.txt
Package: DaRT Scripts (the one with RE_Show.txt and RE_Hide.txt)
Create WinRE Folder on RecoveryDisk
Command line: cmd /c md S:\Recovery\WindowsRE
Copy DaRT Image to RecoveryDisk
Command line: cmd /c copy DaRT_W8_x64.wim S:\Recovery\WindowsRE\WinRE.wim
Package: DaRT WIM
Note: Change the DaRT WIM name to match your own, but the target location must be the same. It must be WinRE.wim.
Set DaRT as WindowsRE Image
Command line: cmd /c C:\Windows\System32\REAgentC.exe /setreimage /path S:\Recovery\WindowsRE\ /bootkey 3b00
Note: The bootkey is optional, but I like having it. You can make it whatever you want.
Enable DaRT WindowsRE Image
Command line: cmd /c C:\Windows\System32\REAgentC.exe /enable
Remove Drive Letter from RecoveryDisk
Command line: cmd /c DiskPart.exe /s RE_Hide.txt
Package: DaRT Scripts
And that's it... once the machine is imaged you can try out the Recovery Environment and you should now see the DaRT tools added in under the 'Troubleshoot' menu:

You can validate that the Recovery Environment has been set by using "reagentc /info" in the running Windows 8 OS. I did note that since I called REAgentC from under C:\Windows\System32 and did NOT check the 'Disable 64-bit file system redirection' that when I did this on a x64 version of Windows 8 and went to validate it in a Command Prompt, the info said it was disabled. Don't have a minor heart-attack (like I did) thinking it isn't working, change directory to C:\Windows\SysWOW64 and try "reagentc /info" again... this time it should say Enabled if you've done everything right.
As I noted in the other article, testing the Recovery Environment in VMs can be tricky, so use "reagentc /boottore" to set the RE to load automatically on next reboot. You'll save your sanity (and your F8 key!).
Hope this helps someone else.... have a great Thanksgiving!
- DCtheGeek
Thank you very much ! You have write a good article this work also with windows 10. Good job !
ReplyDelete